
2.4 | In-Class Edit
As we begin our next unit in Video Production, we will start with a simple exercise for you to get comfortable with the video camera and re-introduce you to editing with Premiere Pro.
For this exercise you will create a small video (30 - 45 seconds), similar to the one I did in the class demo. You will work with a partner using your assigned camera and tripod. Your scene might be two characters meeting to have a simple small conversation, or a single student getting up from the classroom work desks to leave the scene through a door. Don't over complicate this --- keep it simple; we will have an opportunity to create something more elaborate in another upcoming assignment.
For this exercise you will create a small video (30 - 45 seconds), similar to the one I did in the class demo. You will work with a partner using your assigned camera and tripod. Your scene might be two characters meeting to have a simple small conversation, or a single student getting up from the classroom work desks to leave the scene through a door. Don't over complicate this --- keep it simple; we will have an opportunity to create something more elaborate in another upcoming assignment.
- To help in figuring out your shots that you need, and what the script will be, you should draw in the area that you were assigned to ensure that you are not crossing the line of action in your shots. This will help to make you shot correctly.
- Only one storyboard for each group is needed.
- Storyboard must be completed prior to getting camera to shoot.
- Using a storyboard sheets, create your short story to meet the requirements of this assignment.
- See Exemplars below and in the Helpful Tips and Refreshers area for storyboard shot types and abbreviations.
- The story and content must be appropriate and not contain anything offensive or violent.
- The scenes following will be one or both characters leaving the scene through a door, then entering into another scene.
- All cuts in the movie will be straight cuts with no special effects or other treatment done to the clips. Avoid, pans, or other movements if you and your partner can not do this on your own.
- Avoid zoom shots. Zoom are great if used correctly. They tend to be used more in demonstration style videos
- This will be similar to the in-studio demo on how to shot multiple scenes, angles, and scene movements with a single camera and tripod. So all shots must be done on the tripod.
- Remember to create interesting shots. Do multiple shots to ensure that you have good useable footage. Also, think of how the last scene ended to setup for the next scene you are creating.
- Once you have finished filming, each member of the group will upload the same footage to their own computer and then edit their own version using the same clips.
- Each partner will edit their own version of the small film using Premiere Pro.
- Remember to have good tight edits that show good flow to the story and dialogue.
- When the characters face leaves the scene, the scene should cut to the next shot. We are only using straight cuts, no other transitions (except dip to black at the beginning and ending of your submitted video.
- Good editing should not produce a choppy looking video. Take your time and edit well.
- Don't forget that you might need to reduce the scale of your footage to fit the fame of the playback window if someone of something is getting cut off. The camera's shoot for 16:9, we are editing in 4:3.
- Add a title at the beginning and credits at the end of your film.
- Remove any audio if needed. Do this at the very end, since the sound might help with your edits. You might want to use one audio track over the other to keep things consistent.
- Suggested Timeline: The whole filming and editing will take place over three full class periods. You will need a half period or less to plan. A half to full period to film and the remaining time to edit. No extra time will be given on this assignment, so if you can't complete during the given class time, work during your lunch, come in early in the mornings, or after school until 3:30 p.m. Please let me know ahead of time incase I have other commitments already scheduled.
- Final edited movie is due at the end of the period FRIDAY, DEC. 14TH., 2018.
- scroll further down (below IMPORTING MEDIA FROM YOUR CAMERA) to read how to submit your work.
DUE DATE: MONdaY, MARCH 9th., 2020
EXEMPLARS
|
Single Character
The above single character video was from the demo I did with the class. It is much shorter than the requirements in the assignment. If you plan on having one character have them do things like work on homework, computer, etc.
|
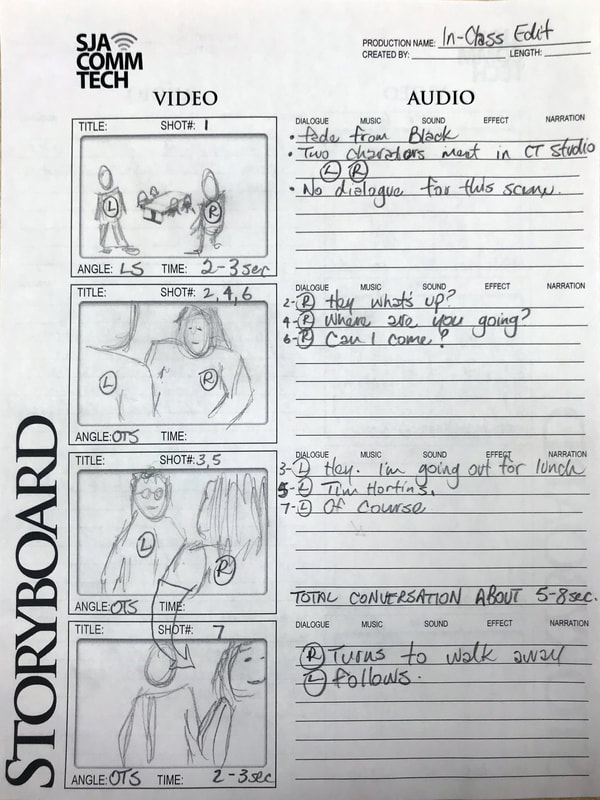
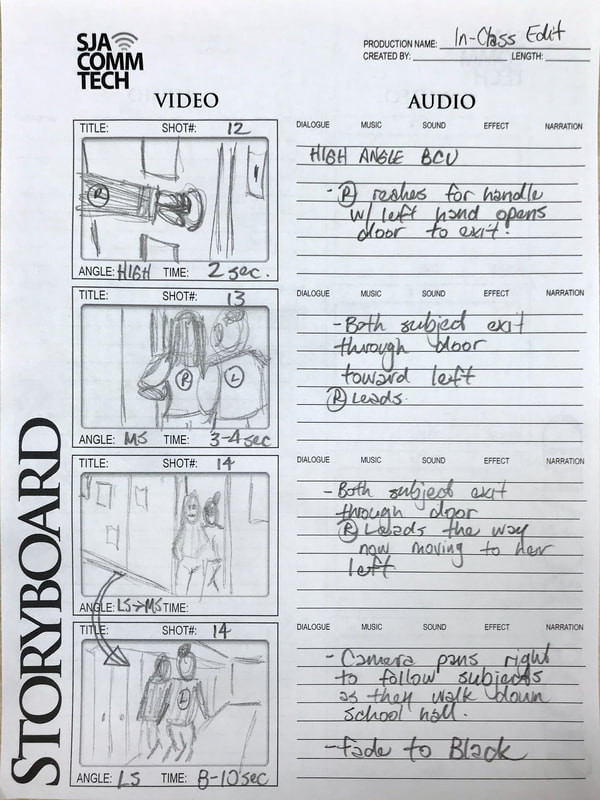
Two Characters
Storyboards for the Lunch at Tim Horton's In-Class Edit
|

Helpful Tip and Refreshers
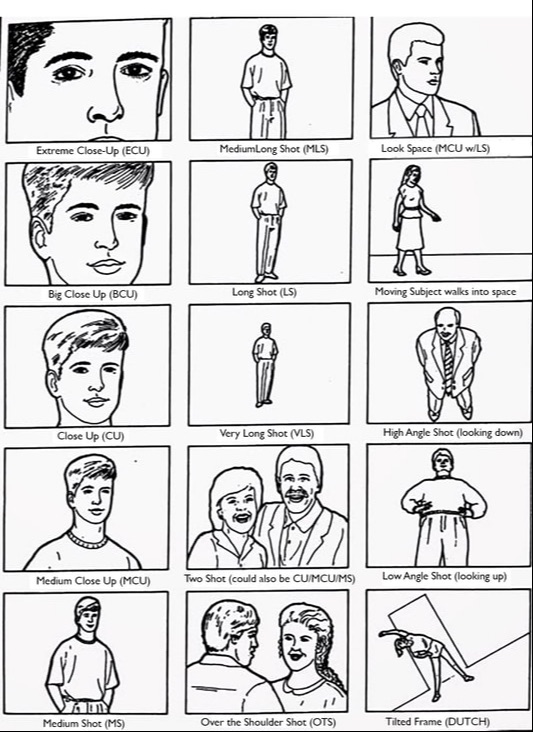
Storyboard Shot Types & Abbreviations
|
|
Importing MEDIA from your Camera - two methods will work
After you have acquired footage, follow one of the methods below to get started importing your footage into the computer.
Using the Photo ApplicaTion
** If this method doesn't work for you try the iMovie method.
|
Using Imovie
|
EdiTing setup using Premiere Pro
|
Launch Premiere Pro. 1. Start a new project Start a new project from the Premiere Pro Start screen.
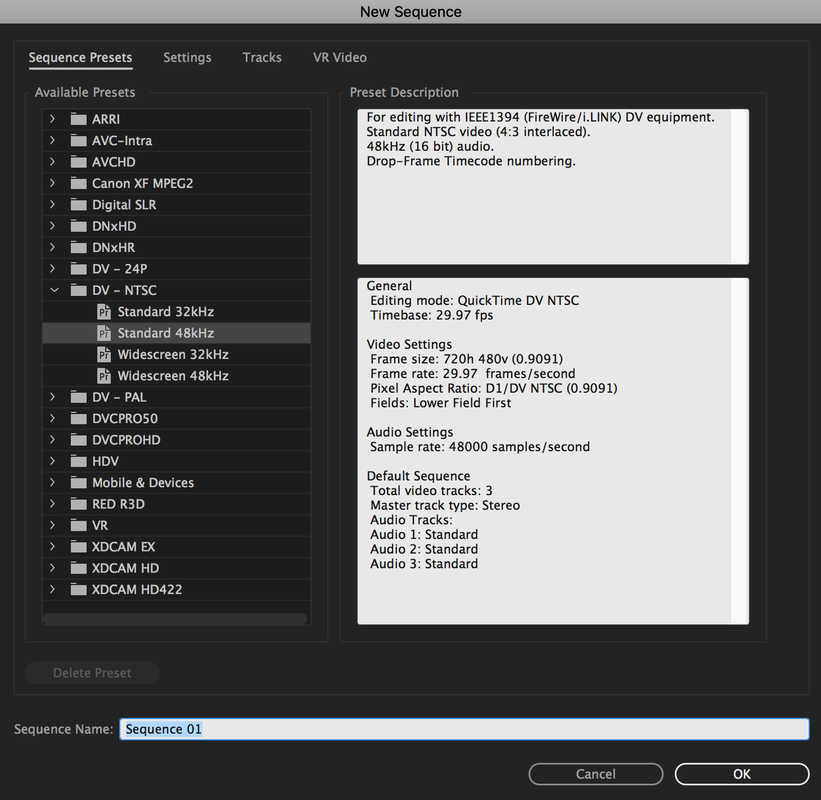
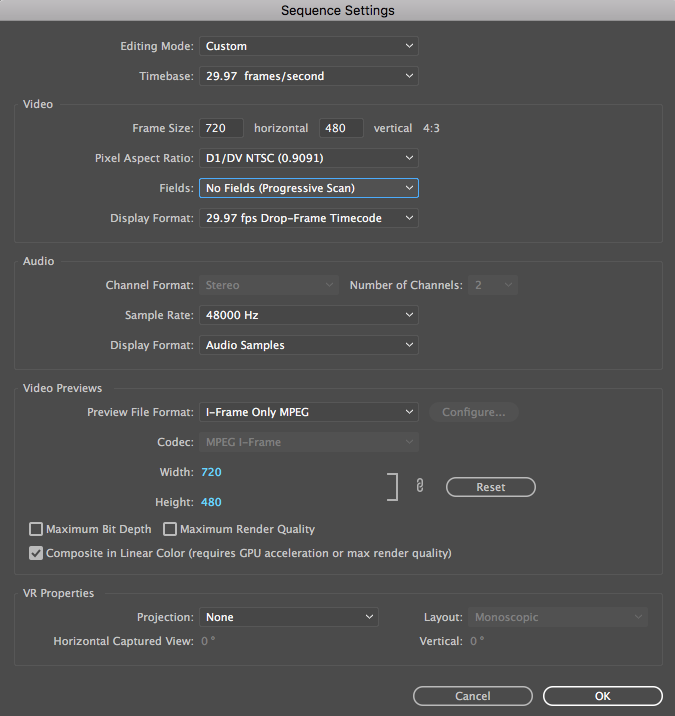
If you don't have the preset set your sequence settings to the settings to the right. Change Editing Mode: Custom Timebase: 29.97 frames/second Video Frame size is: 720 horizontal 480 vertical 4:3 Pixel Aspect Ratio: D1/DV NTSC (0.9091) Fields: No Fields (Progressive Scan) |

|
2. Import video.
Using the Media Browser you can import the contents of the RAW VIDEO folder from your desktop
You can also import various digital media, including video, audio, and still images. Premiere Pro also imports Adobe® Illustrator® artwork or Photoshop® layered files, and it translates After Effects® projects for a seamless, integrated workflow.
Using the Media Browser you can import the contents of the RAW VIDEO folder from your desktop
- In the bottom left corner of the Premiere Pro wrokspace, look for the Media Browser tab, click on it to open the window.
- Then under the Local Drives area click on the ">" to turn down the items in the Local Drives area.
- Look for > Secondary OSX
- Users >
- Your Student Number >
- RAW FOOTAGE >
- You should now see all the clips you need to import. If you are importing many clips you and also press the 'tilda' key; below escape on your keyboard to zoom the folder for better viewing. Pressing the same key will zoom back to normal view.
- Select all the clips you need.
- Right click or control click your mouse and you will see the Import option. Select Import.
- You have now imported the selected clips into the project bin to use in your editing.
You can also import various digital media, including video, audio, and still images. Premiere Pro also imports Adobe® Illustrator® artwork or Photoshop® layered files, and it translates After Effects® projects for a seamless, integrated workflow.
3. Assemble and refine a sequence
From the Project Bin, select and drag your selection into the Sequence timeline to start your first edit.
Using the various tools you can cut, resize, to delete and item you don't need.
Common keyboard shortcuts are:
From the Project Bin, select and drag your selection into the Sequence timeline to start your first edit.
Using the various tools you can cut, resize, to delete and item you don't need.
Common keyboard shortcuts are:
- Selection Tool (Arrow) - v
- Razor/Cut Tool - c
- Type Tool - t
- Save - CMD & s
SUBMITTING YOUR WORK
|

|
RUBRIC

